


Transforming your kitchen doesn’t have to involve a costly renovation or weeks of construction. One of the simplest and most effective ways to refresh your kitchen’s aesthetic is by using tile stickers for your backsplash. These affordable, versatile, and easy-to-apply products allow homeowners to achieve a high-end look without the hassle of traditional tiling. In this guide, we’ll explore what tile stickers are, their benefits, how to choose the right ones, step-by-step application tips, and maintenance advice to ensure your kitchen stays stunning for years.
What Are Tile Stickers for Backsplash?
Tile stickers, also known as peel-and-stick tiles or vinyl decals, are adhesive-backed coverings designed to mimic the look of traditional ceramic, porcelain, or glass tiles. Made from durable materials like vinyl or PVC, these stickers come in a variety of patterns, colors, and textures, allowing you to replicate the appearance of subway tiles, mosaic patterns, or even intricate Moroccan designs. Unlike traditional tiles, tile stickers require no grout, no cutting tools, and no professional installation, making them a perfect choice for DIY enthusiasts.
Tile stickers are typically sold in sheets or rolls, with individual “tiles” pre-cut or scored for easy application. They adhere directly to existing surfaces, such as old tiles, drywall, or even painted walls, providing an instant upgrade. Whether you’re a renter looking for a temporary solution or a homeowner seeking a budget-friendly refresh, tile stickers offer a practical and stylish option.
Why Choose Tile Stickers for Your Kitchen Backsplash?
1. Affordability
Traditional tile installation can be expensive, factoring in the cost of materials, tools, and labor. Tile stickers, on the other hand, are significantly cheaper, often costing between $5 and $20 per square foot, depending on the design and brand. This makes them an attractive option for those working with a tight budget.
2. Ease of Installation
One of the biggest advantages of tile stickers is their simplicity. No need for specialized tools or skills—just a clean surface, a pair of scissors, and a steady hand. Most projects can be completed in a few hours, making it an ideal weekend DIY project.
3. Versatility
Tile stickers come in countless designs, from classic white subway tiles to vibrant geometric patterns. Whether your kitchen leans modern, farmhouse, or eclectic, there’s a tile sticker to match your style. Many brands also offer customizable options, allowing you to mix and match colors and patterns.

4. Removability
For renters or those who love to change their decor frequently, tile stickers are a game-changer. Most are designed to be removable without damaging the underlying surface, making them a commitment-free way to experiment with bold designs.
5. Low Maintenance
Unlike traditional tiles, which require grout cleaning and sealing, tile stickers are easy to maintain. A quick wipe with a damp cloth is usually enough to keep them looking fresh.
Choosing the Right Tile Stickers for Your Kitchen
Selecting the perfect tile stickers involves considering your kitchen’s style, the durability of the product, and practical factors like heat and water resistance. Here are some tips to guide your decision:
1. Match Your Kitchen’s Aesthetic
Consider the overall vibe of your kitchen. For a timeless look, opt for neutral tones like white, gray, or beige subway tile stickers. If you want to make a bold statement, choose vibrant colors or intricate patterns like herringbone or arabesque. For a cohesive design, ensure the stickers complement your countertops, cabinetry, and flooring.
2. Check Material Quality
Not all tile stickers are created equal. Look for high-quality vinyl or PVC stickers that are waterproof, heat-resistant, and durable. These qualities are essential for a kitchen backsplash, which is exposed to splashes, grease, and heat from cooking. Check product reviews or ask for samples to assess thickness and adhesive strength.
3. Measure Your Space
Before purchasing, measure the area you plan to cover. Most tile stickers are sold in standard sizes, such as 12x12-inch sheets, so calculate the square footage to ensure you buy enough. It’s a good idea to order 10-15% extra to account for mistakes or irregular cuts.
4. Consider Application Surface
Tile stickers adhere best to smooth, clean surfaces. If your kitchen has textured walls or uneven tiles, you may need to sand or prime the surface first. Some stickers are designed specifically for application over existing tiles, so check the manufacturer’s recommendations.
5. Look for Heat and Water Resistance
Since kitchens are high-traffic areas, choose stickers labeled as heat- and water-resistant. These are better equipped to withstand steam from cooking, splashes from the sink, and occasional spills.
Step-by-Step Guide to Applying Tile Stickers
Installing tile stickers is a straightforward process, but attention to detail is key to achieving a professional-looking result. Follow these steps for a flawless backsplash upgrade:

Step 1: Gather Your Supplies
You’ll need:
- Tile stickers
- Measuring tape
- Level
- Utility knife or scissors
- Cleaning supplies (mild detergent, water, cloth)
- Smoothing tool (like a credit card or plastic squeegee)
- Pencil and ruler (optional for marking cuts)
Step 2: Prepare the Surface
Clean the backsplash area thoroughly to remove grease, dust, or debris. Use a mild detergent and water, and ensure the surface is completely dry before proceeding. If applying over existing tiles, ensure the grout lines are clean and free of mold.
Step 3: Measure and Plan
Measure the backsplash area and plan your layout. Decide whether you want the stickers to align with existing tiles or create a new pattern. Use a level to mark straight lines, especially for subway or grid patterns, to ensure even placement.
Step 4: Cut Stickers to Size
If your backsplash includes outlets, corners, or edges, measure and cut the stickers to fit using a utility knife or scissors. For precision, create a paper template of tricky areas before cutting the stickers.
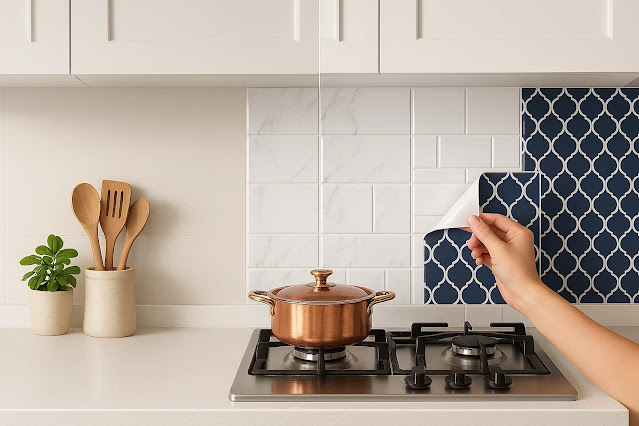
Step 5: Apply the Stickers
Peel off the backing of the first sticker and carefully align it with your marked lines. Press it onto the surface, starting from the center and smoothing outward to avoid air bubbles. Use a smoothing tool to ensure a secure bond. Continue applying stickers, overlapping slightly if necessary to mimic grout lines.
Step 6: Trim and Finish
Once all stickers are applied, trim any excess with a utility knife. Double-check for bubbles or loose edges, and press firmly to secure. If your stickers aren’t pre-sealed, consider applying a clear sealant for extra protection against moisture and heat.
Step 7: Admire Your Work
Step back and enjoy your refreshed kitchen! The transformation is instant, and you’ll likely be amazed at how professional the results look.
Maintenance Tips for Tile Stickers
To keep your tile sticker backsplash looking pristine, follow these care tips:
- Clean Regularly: Wipe the stickers with a damp cloth and mild soap to remove grease or stains. Avoid abrasive cleaners or scrubbers that could damage the surface.
- Avoid Excessive Heat: While most tile stickers are heat-resistant, prolonged exposure to high heat (e.g., directly behind a gas stove) may cause peeling. Consider installing a heat shield or glass panel in these areas.
- Check Adhesion: Periodically inspect the edges of the stickers to ensure they’re still secure. If you notice lifting, press them down or apply a small amount of adhesive.
- Remove Carefully: If you decide to change the design, peel off the stickers slowly at a 45-degree angle. Use a hairdryer to loosen the adhesive if needed, and clean the surface afterward to remove any residue.

Creative Ideas for Using Tile Stickers
Beyond the backsplash, tile stickers can be used creatively to enhance other areas of your kitchen:
- Cabinet Accents: Apply stickers to cabinet edges or drawer fronts for a coordinated look.
- Appliance Refresh: Cover small appliances or the edges of countertops for a cohesive design.
- Faux Floor Tiles: Use durable tile stickers to create a temporary floor design in a rental or small space.
- Statement Wall: Extend the backsplash design to an accent wall for a bold, modern effect.
Where to Buy Tile Stickers
Tile stickers are widely available online and in home improvement stores. Popular retailers include Amazon, Etsy, Home Depot, and Wayfair, where you’ll find a range of designs and price points. Specialty brands like Smart Tiles and Tic Tac Tiles offer high-quality options with realistic textures. Always read reviews and check return policies before purchasing.
Conclusion
Tile stickers for backsplashes are a game-changer for anyone looking to upgrade their kitchen without breaking the bank or committing to a permanent change. With their affordability, ease of installation, and endless design possibilities, they offer a practical solution for homeowners and renters alike. By choosing high-quality stickers, preparing your surface properly, and following a few simple maintenance tips, you can achieve a stunning, professional-looking backsplash that elevates your kitchen’s style. So, why wait? Grab some tile stickers, unleash your creativity, and give your kitchen the upgrade it deserves!


.jpg)


0 Comments