


The kitchen is the heart of the home—a place where meals are crafted, memories are made, and conversations flow as freely as the coffee. But let’s be honest: not every kitchen feels like a dream space. Maybe yours is stuck in the ’90s with dated cabinets, or perhaps it’s just lacking that spark of personality. The good news? You don’t need a massive budget or a professional designer to give your kitchen a stylish makeover. With a bit of creativity, some elbow grease, and these DIY ideas, you can transform your kitchen into a space that’s both functional and fabulous. Let’s dive into some inspiring, budget-friendly projects that add a personal touch while keeping style and practicality front and center.
Why a DIY Kitchen Makeover?
Before we get into the nitty-gritty, let’s talk about why DIY is the way to go. First, it’s cost-effective—renovating a kitchen professionally can cost thousands, but DIY projects let you stretch your budget. Second, it’s personal. When you roll up your sleeves and put your own spin on a project, the result feels like you. I remember when I revamped my own kitchen last summer; the moment I painted my cabinets a bold sage green, it was like the whole room came to life. It wasn’t just a new look—it was my look. Plus, DIY builds confidence. There’s something deeply satisfying about stepping back and saying, “I did that.” Ready to make your kitchen your own? Here are some stylish, approachable ideas to get you started.
1. Paint Your Cabinets for a Fresh, Modern Look
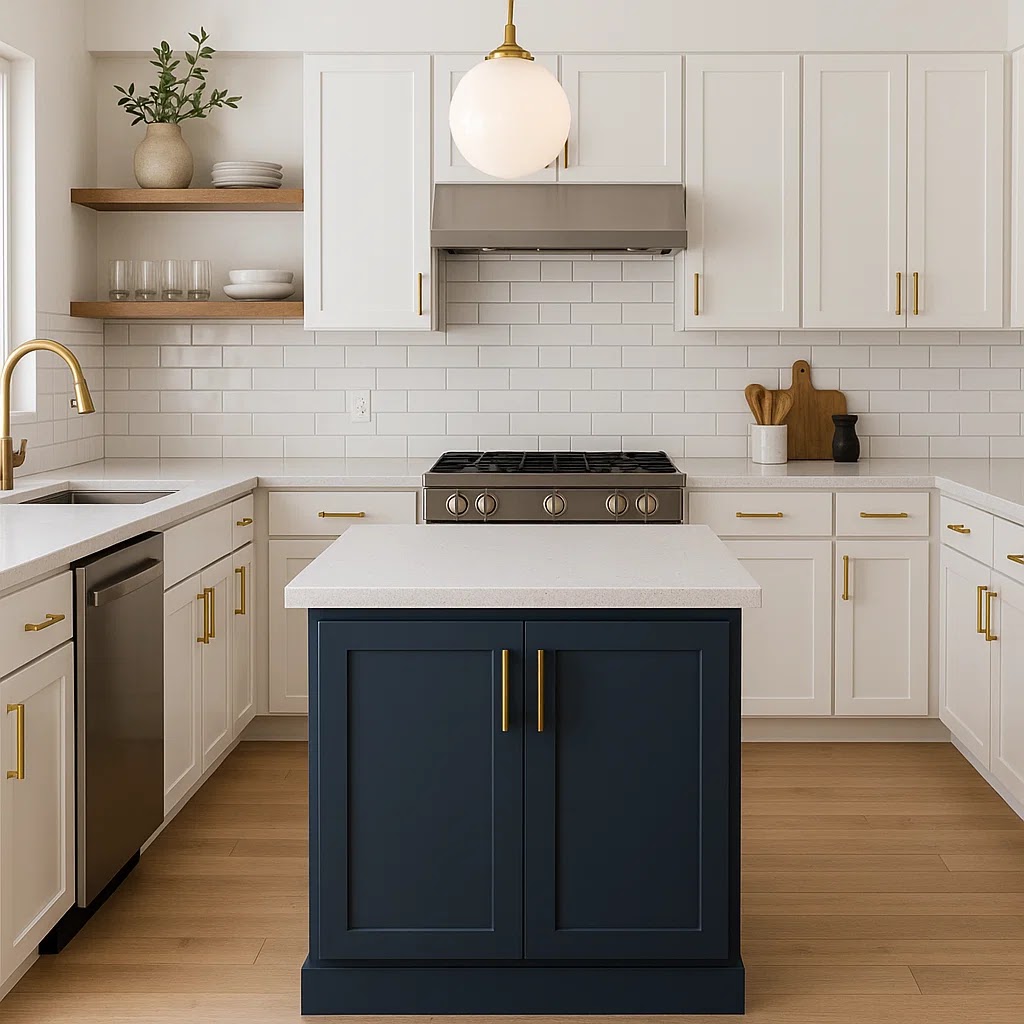
One of the easiest and most impactful ways to refresh your kitchen is by painting your cabinets. It’s amazing what a fresh coat of paint can do to dated wood or tired laminate.
How to Do It:
- Prep is Key: Remove cabinet doors and hardware, then sand surfaces lightly to help the paint adhere. Clean thoroughly to remove grease.
- Choose Your Color: Bold colors like navy, forest green, or even a soft blush pink are trending for 2025. For a timeless look, go with crisp white or warm gray. I chose sage green for my cabinets because it felt calming yet sophisticated—perfect for my cozy vibe.
- Prime and Paint: Use a high-quality primer to prevent chipping, then apply two coats of semi-gloss or satin paint for durability. A paint sprayer gives a pro finish, but a foam roller works well too.
- Add New Hardware: Swap out old knobs and pulls for sleek brass, matte black, or ceramic handles to elevate the look.
Pro Tip: If you’re hesitant about bold colors, try a two-tone effect—paint upper cabinets a light shade and lower ones a darker hue for depth.
Why It Works: Painting cabinets is budget-friendly (a gallon of paint costs $30–$50) and completely transforms the space. It’s a weekend project that delivers big results.
2. Create a Statement Backsplash with Peel-and-Stick Tiles
A backsplash is like jewelry for your kitchen—it adds personality and polish. If you’re renting or on a budget, peel-and-stick tiles are a game-changer. They’re affordable, easy to install, and removable without damaging walls.
How to Do It:
- Measure and Plan: Measure your backsplash area and buy enough tiles to cover it. Patterns like subway, herringbone, or Moroccan-inspired designs are popular.
- Clean and Prep: Wipe down walls to remove grease and dust. A clean surface ensures tiles stick properly.
- Install with Care: Start from the center and work outward for symmetry. Use a level to keep lines straight. Cut tiles with a utility knife for edges and outlets.
- Seal It: Some tiles require a sealant for extra protection against spills and splashes.
Personal Touch: I added a herringbone pattern with white and gold peel-and-stick tiles behind my stove. It took one afternoon and made the kitchen feel like it belonged in a magazine. Choose a pattern that speaks to you—maybe geometric for a modern vibe or colorful for a boho flair.
Why It Works: Peel-and-stick tiles cost $5–$15 per square foot, and you can find them at hardware stores or online. They’re renter-friendly and add instant style.
3. Upgrade Your Lighting for Ambiance and Function
Lighting can make or break a kitchen’s vibe. Swapping out an outdated fixture for something fresh can change the entire feel of the space.
DIY Ideas:
- Pendant Lights: Install pendant lights over an island or sink for a modern touch. Look for woven, brass, or glass designs to add texture.
- Under-Cabinet Lighting: Add LED strip lights under cabinets for task lighting and a warm glow. They’re easy to install with adhesive backing.
- Statement Chandelier: If your kitchen doubles as a dining space, a bold chandelier can be a showstopper. I found a vintage-inspired one at a thrift store for $20 and spray-painted it gold for a custom look.


How to Do It:
- Turn off power at the breaker for safety.
- Follow the fixture’s instructions to remove the old light and install the new one. Most pendants and chandeliers are straightforward swaps.
- For under-cabinet lights, stick LEDs in place and plug them into a nearby outlet.
Why It Works: Lighting is both functional and decorative. It highlights your new backsplash or countertops and creates a cozy atmosphere for late-night snacks.
4. Refresh Countertops on a Budget
New countertops can be pricey, but there are clever DIY alternatives that mimic the look of marble, butcher block, or concrete without breaking the bank.
Options to Try:
- Contact Paper: Marble or granite-look contact paper is a quick fix. Apply it over clean, smooth countertops for a high-end look at $10–$20 per roll.
- Concrete Overlay: Spread a thin layer of concrete over existing countertops, then sand and seal for an industrial vibe. Kits are available for $100–$200.
- Paint Kit: Countertop paint kits (like those from Giani) let you create a faux marble or stone effect. I tried this in my old apartment, and while it took patience, the result was stunning for under $100.
How to Do It: Follow kit instructions carefully, and don’t skip sanding or sealing steps. These ensure durability in a high-traffic area like the kitchen.
Why It Works: These methods are a fraction of the cost of new countertops ($500+ for professional installs) and let you customize the look to match your style.
5. Add Open Shelving for Style and Storage
Open shelving is a hot trend that adds both storage and a chance to show off your personality. It’s perfect for displaying dishes, plants, or quirky finds.
How to Do It:
- Choose Your Shelves: Buy pre-made floating shelves or make your own with wood planks and brackets. Stain or paint them to match your aesthetic.
- Install Securely: Use a stud finder to anchor shelves into studs for stability. A level ensures they’re straight.
- Style Thoughtfully: Mix practical items (like plates and bowls) with decorative ones (plants, candles, or art). I added a small ceramic vase from a local market to my shelves—it’s a conversation starter every time friends visit.
Why It Works: Shelves free up cabinet space and make your kitchen feel airy. They’re also budget-friendly, with basic shelves costing $20–$50.

6. Personalize with Small Details
Sometimes, it’s the little things that make the biggest impact. Here are quick, budget-friendly ways to add your personality:
- New Faucet: Swap out an old faucet for a sleek, modern one. Touchless or matte black faucets are trending and cost $50–$150.
- Decorative Accents: Add a colorful rug, patterned dish towels, or a chalkboard for meal planning. I painted a small chalkboard panel on one wall for grocery lists—it’s practical and cute.
- Plants or Herbs: A few potted herbs on the windowsill add life and freshness. Basil and mint are easy to grow and smell amazing.
SEO Optimization Tips for Your Kitchen Makeover Journey
If you’re documenting your makeover (maybe for a blog or social media), optimize your content to reach more DIY enthusiasts:
- Keywords: Use phrases like “DIY kitchen makeover,” “budget kitchen ideas,” “stylish kitchen upgrades,” and “peel-and-stick backsplash” naturally throughout your post.
- Headings: Break up content with H2 and H3 headings (like I’ve done here) for readability and SEO.
- Images: Include high-quality photos of your projects with alt text like “DIY painted kitchen cabinets” or “peel-and-stick backsplash installation.”
- Link to Resources: Mention tools or products with links to trusted retailers (e.g., “I got my peel-and-stick tiles from [retailer]”).
- Engage Readers: End with a call to action, like “What’s your favorite DIY kitchen idea? Share in the comments!”
Final Thoughts: Make It Yours
A stylish kitchen makeover doesn’t have to be expensive or overwhelming. By focusing on projects like painting cabinets, adding a backsplash, or upgrading lighting, you can create a space that’s uniquely yours. The key is to start small, embrace your style, and enjoy the process. My own kitchen makeover taught me that imperfections—like a slightly uneven paint stroke—add character. Your kitchen should tell your story, so grab a paintbrush, pick a project, and get started.


.jpg)


0 Comments